This is a setup guide for our MT5 webhook EA that connects TradingView strategies with MetaTrader automation.
If you haven’t gotten our EAs yet, you can purchase access to all our TradingView strategies + the EAs using this link. Then come back here to finish your setup.
Inside your whop dashboard you will find all the downloadable products you need to automate your trading. You don’t need to download or use all of them, just pick MetaTrader 4 or 5 EA and connect it with the strategy of your choice provides by us or feel free to use your own TradingView strategy.
Step 1: Generate your webhook
Go to this page: https://fxdsniper.com/webhook – this is where you’re going to generate the necessary tokens to make everything work.
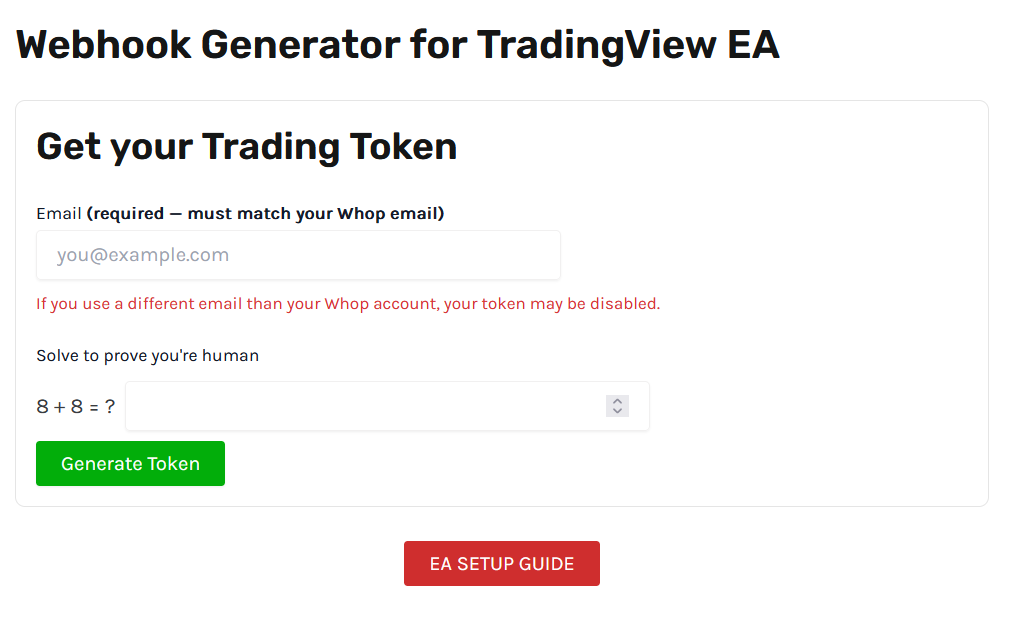
Use the same email as your whop account to generate your token or it may be disabled and your EA will not work properly.
Once you click the Generate Token button an email will be sent to you with the details and you will see a page like this:

Your token is what will be used to identify your signals sent from TradingView and will allow MetaTrader to execute those trades.
The webhook URL is already set inside the EAs so you don’t need it there but you do need it to paste into your TradingView alerts and it’ll always be this: https://fxdsniper.com/wp-json/tvrouter/v1/hook
And the TradingView Alert JSON is the message you need to paste inside the message when setting up TradingView alerts. This will tell our EA what action to perform when the alert triggers.
Step 2: TradingView Setup
On TradingView you will get access to currently 3 of our indicators which can be used to receive signals and automate the trading process with our EAs. Don’t just rely on our settings, do try out other settings for yourself and see what suits you, there’s literally 1000s of combinations for our indicators that can be adjusted to whichever asset you prefer.
FXD Volume Signal Indicator v1.7 – this is the best and most reliable indicator to use with the EA. Good amount of signals with good accuracy, perfect for day trading or swing trading style depending on your settings.
FXD Volume Signal Simplified – HFT style signals, many signals following the trend and catching reversals early. Good for scalping and occasionally holding trades longer and has more of a bot like behaviour.
FXD Volume Signal (Beta 2.0) – This is a mix of the two indicators also good for scalping or intraday trading with an occasional runner.
To set up your TradingView alerts either right click on the chart and click “add alert” or click “ctrl + A” on your keyboard. You will be presented with these windows:
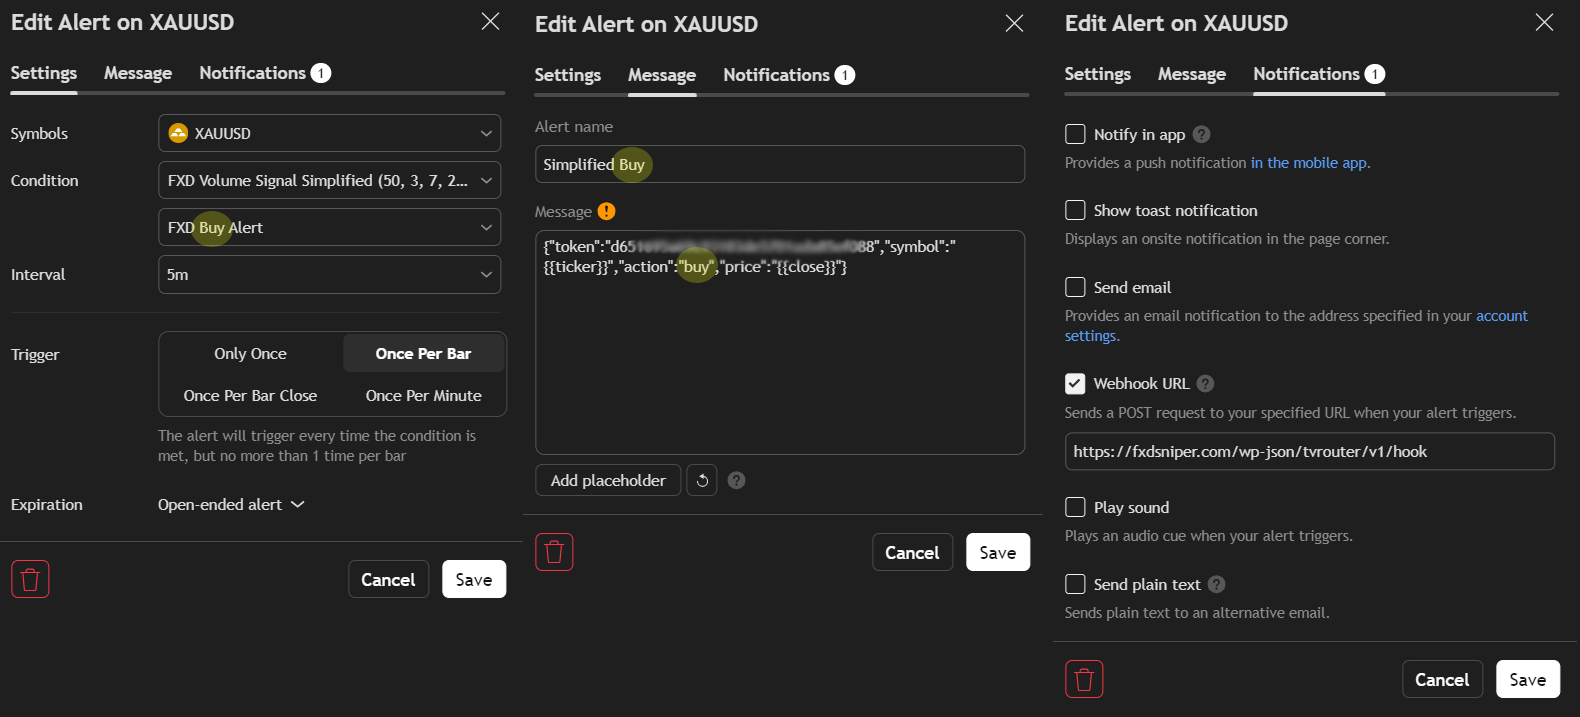
You will need to set up a separate alert for buys and sells and different assets, that’s just how TradingView works.
Symbol: That’s the asset you’re setting up the alert for.
Condition: This is the indicator/strategy you will be using to trigger the alert and this is where you set the buy or sell signals.
Interval: This is the timeframe the indicator/strategy will use.
Trigger: Once Per Bar or Once Per Minute are the only two you should be using as they will send the signal right when it triggers or repeat it if all conditions are still met.
Expiration: Set it to never end or set the furthest date possible to avoid having your alerts expire too early.
Alert Name: This can be set to whatever you like, this will be title of the alert sent by TradingView.
Message: Paste the JSON message generated earlier here so it looks like in the image above. Make sure the action is set to buy if your condition is also a buy and sell if it’s a sell condition.
Webhook URL: Make sure this box is selected and the link to our feed is exactly as its shown in the image. If you with to receive in app notifications, emails etc you an select them in this tab as well.
This is your alert set, make sure you always check the conditions and actions every time you set up new alerts or you’ll end up sending buy signals for a sell or vice versa.
Now you’re ready to connect the EA!
Step 3: EA setup
Onen you MetaTrader 4 or 5 and click on files -> Open Data Folder

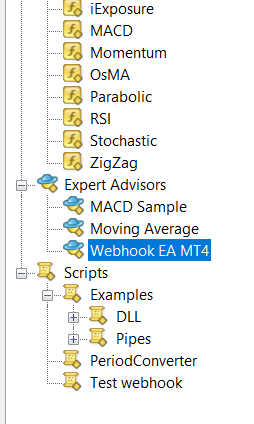
Then go to MQL4 or MQL5 -> Experts, paste your EA files you downloaded earlier into this folder.
Now the EA should be visible in the Experts tab, if not refresh or restart the app.
Now you just need to drag the EA onto your chart window and set it up with your desired settings. (Our pre-made list of settings can be found inside our whop or just use the default)
This is a breif explanation of all the settings, they are the same for both MT4 and MT5 and a more in-depth explanation of the settings can be found inside our whop along with other lists of settings.

Right now you have the EA setup and connected but it’s not yet working. To make it work there’s a final step you need to do.
Click on Tools – > Options -> Experts Advisors
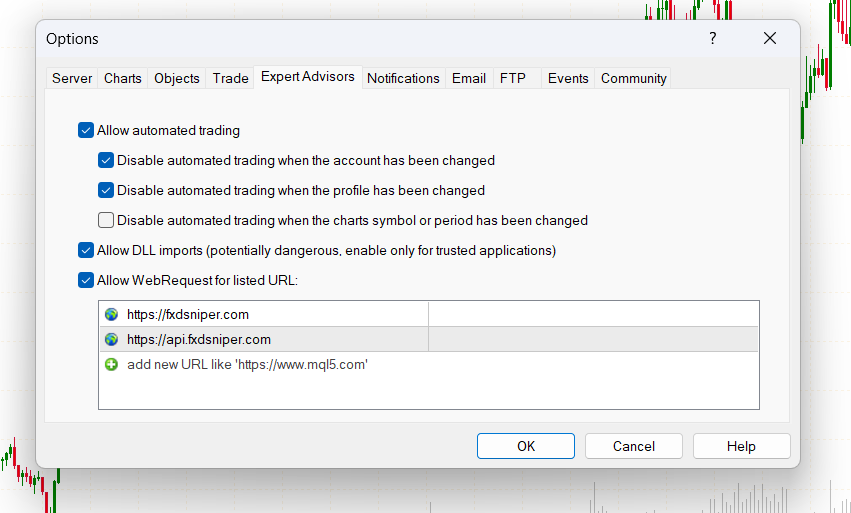
Make sure you have “Allow DDL imports” and “Allow WebRequest” ticked on.
And for the URLs below make sure you add:
https://fxdsniper.com and htpps://api.fxdsniper.com
Otherwise without your MetaTrader will not be able to connect with our servers and won’t be able to read and receive any signals sent from TradingView.
And that’s all. You have everything connected and ready to trade for you.
Step 4: VPS 24/7 Trading (Optional)
In order to have your bots running you need to either keep your computer running at all times or you can use a VPS server to host your bots and have it on 24/7. Most forex brokers do offer VPS services to its clients so if you reach out to them most will be happy to assist you with this, however they do require you to meet certain balance/equity requirements to use this type of service.
Personally I use ForexVPS to host my bots, there are cheaper options but this one is built specifically for trading bots in mind and they are very simple to setup and use.
I’m not going to breakdown how to setup your VPS as it depends on which one you’ll use and they all have different setups. Some may require you to choose an operating system before you do anything else so do choose the latest version of Windows and just proceed with the same setup steps from above. The VPS is just a computer same as yours hosted in the cloud allowing you to keep it on 24/7.